Post by Amstel Bear Hugs on Oct 28, 2012 16:53:00 GMT -5
Instructions on how to make an “Animated Signature Line”
The instructions include Photobucket and the website included below:
Go to the following website.
www.gif-mania.net/animated-signatures/
Screen will come up as followings:
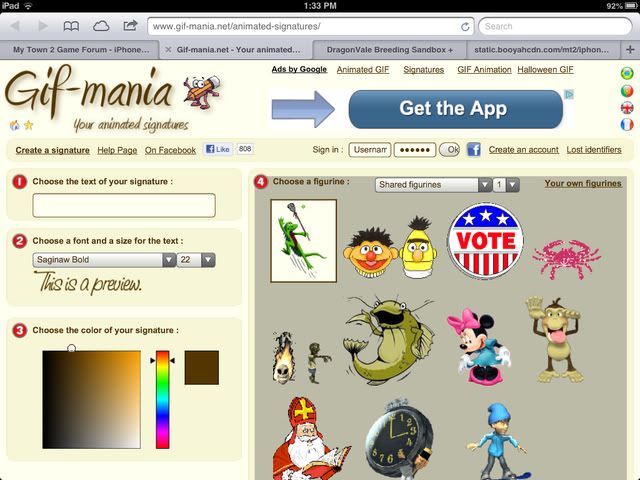
Box number 1- Type in what you want your signature to say- Example your screen name
Box number 2- Choice the font and size of your text that you want. Both have drop down options to choose from. Below the drop down is a preview of how it will look.
Box number 3- Choose the color of your signature text by clicking on the color on the bar. You can adjust the color by dragging the octagon symbol to get your shade more defined. The square shows the color that will be used.
Box number 4- This is where you can pick your animated avatar. Drop down box- with several categories.
You have 2 options.
A) Pick from the “Shared Figurines” or
B) Choose “Your Own Figurines. – NOTE: If you choose your own, it must be in .gif format or it will not accept. Also you may want to complete box 4 first and then go back to 1-3 before you hit "create", since sometimes the information does not save.

If you want to use Your Own Figurine, it will bring you to the following screen:

Click on “Choose File”- Choose Existing and you can pick from your saved photos. Please note: make sure that the picture does not exceed 150 X 150 pixels and in .gif format.
Next- Once you pick your photo- either options (Your own or from the shared list), - Hit the "Create" button- (bottom left hand sde of the screeen.) It will bring you to the following screen:
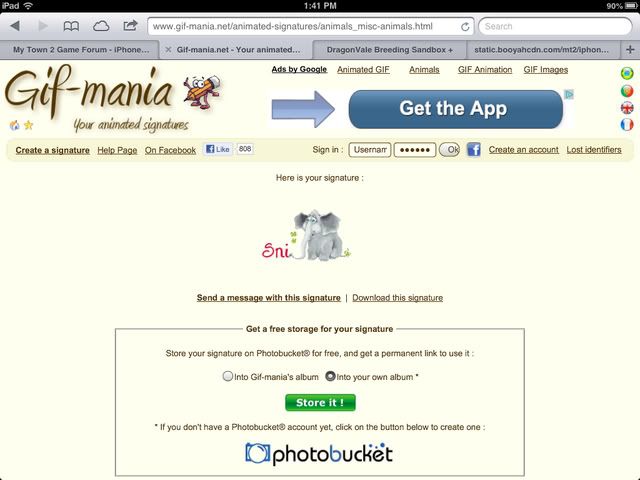
This will show you exactly how it will look.
Make sure you check the “Into your own album” icon (above the STORE IT! Green button)
Hit the "Store it" green button and it will upload to your Photobucket account. It may take several minutes to upload. Once it has, it will bring you to your Photobucket account and it will look like this:

Next click go back to your album and it will now be there.

You now want to copy the “IMG Code” and place it your signature line.
Profile> Modify Profile> Signature> Copy the IMG Code underneath your Town name, ID and level.
Go to the bottom of the page and hit “Modify Profile” and now the animated avatar should appear when you post.
The instructions include Photobucket and the website included below:
Go to the following website.
www.gif-mania.net/animated-signatures/
Screen will come up as followings:

Box number 1- Type in what you want your signature to say- Example your screen name
Box number 2- Choice the font and size of your text that you want. Both have drop down options to choose from. Below the drop down is a preview of how it will look.
Box number 3- Choose the color of your signature text by clicking on the color on the bar. You can adjust the color by dragging the octagon symbol to get your shade more defined. The square shows the color that will be used.
Box number 4- This is where you can pick your animated avatar. Drop down box- with several categories.
You have 2 options.
A) Pick from the “Shared Figurines” or
B) Choose “Your Own Figurines. – NOTE: If you choose your own, it must be in .gif format or it will not accept. Also you may want to complete box 4 first and then go back to 1-3 before you hit "create", since sometimes the information does not save.

If you want to use Your Own Figurine, it will bring you to the following screen:

Click on “Choose File”- Choose Existing and you can pick from your saved photos. Please note: make sure that the picture does not exceed 150 X 150 pixels and in .gif format.
Next- Once you pick your photo- either options (Your own or from the shared list), - Hit the "Create" button- (bottom left hand sde of the screeen.) It will bring you to the following screen:

This will show you exactly how it will look.
Make sure you check the “Into your own album” icon (above the STORE IT! Green button)
Hit the "Store it" green button and it will upload to your Photobucket account. It may take several minutes to upload. Once it has, it will bring you to your Photobucket account and it will look like this:

Next click go back to your album and it will now be there.

You now want to copy the “IMG Code” and place it your signature line.
Profile> Modify Profile> Signature> Copy the IMG Code underneath your Town name, ID and level.
Go to the bottom of the page and hit “Modify Profile” and now the animated avatar should appear when you post.




 everyone is so helpful!!


 So glad I finally got it.



 now small pictures are the thumb nail img? This is the best directions so glad you posted them.💃